

There are several ways to fix the ‘this page isn’t working’ error, but the fixes depend on what caused it.
First, visit a different website and see if you get the message or if it loads. If the other websites are working correctly, that indicates that the connection is valid and that the problem is with your website specifically.
If none of the other websites work, restart your internet connection and try again.
Second, clear your browser cache and see if that helped.
Clear the Browser’s Cache
A browser cache is a temporary location where copies of frequently visited websites, including images, scripts, HTML, CSS, and JavaScript, are stored.
If your browser caches an uncorked version of your website, it will continue to display it even after you fix the issue.
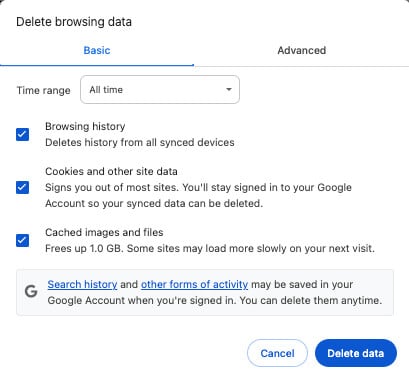
To clear the browser cache in Chrome, click on the three dots in the top right corner and then on Delete Browsing Data.
On the next screen, check all the boxes and click Delete data.
In Firefox, click on the burger menu -> Settings -> Privacy & Security -> Clear Data. Check both boxes and hit Clear.
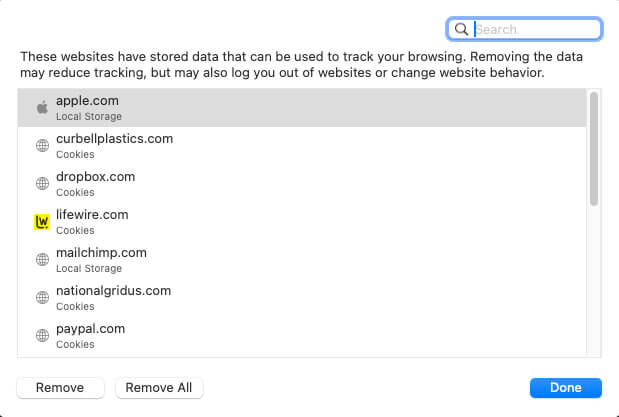
Go to Settings -> Privacy -> Manage Website Data and click Remove All for the Safari browser.
Once you have cleared your browser of choice data, revisit your website and check if the problem was solved.
You should also check any firewall settings, antivirus, VPN, or proxy server you use, as they can cause the error. Turn off the software or service to see if it clears the error.
Some users successfully solved the issue after changing their DNS servers and resetting their TCP/IP options.
Delete DNS Cache
Your computer stores the IP addresses of all the websites you visit in a DNS cache, which allows you to avoid looking up the same IP address multiple times.
Cached DNS information can become out-of-date despite its ability to speed up website loading. An error message may appear if a website or WordPress has changed hosts or domain names.
By clearing your DNS cache, you can access the most recent information about a website, such as its new domain name or address.
To clear the DNS cache in Windows, click on the Start button and launch the Command Prompt tool (CMD).
Then, please enter the following command and click enter to run it.
ipconfig /flushdns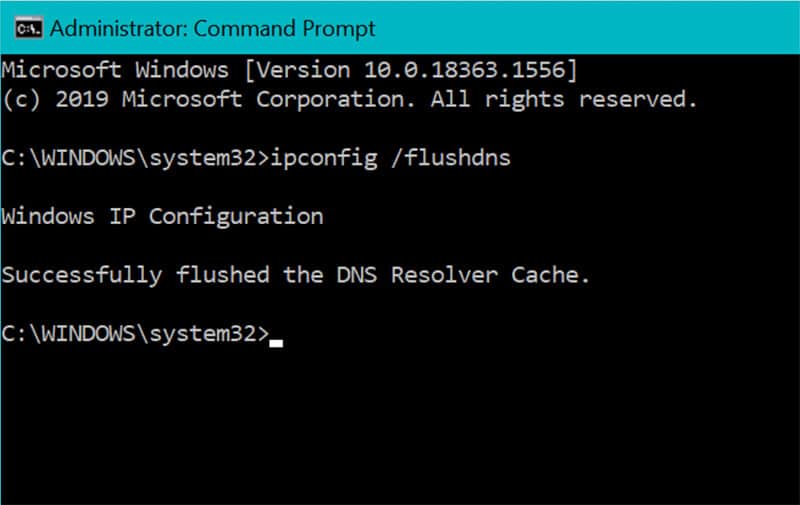
Wait for the DNS cache to clear before visiting your website.
To clear the DNS cache in Mac, open your Applications screen and look for the Terminal app.
Write the following command and click enter to execute it.
sudo killall -HUP mDNSResponder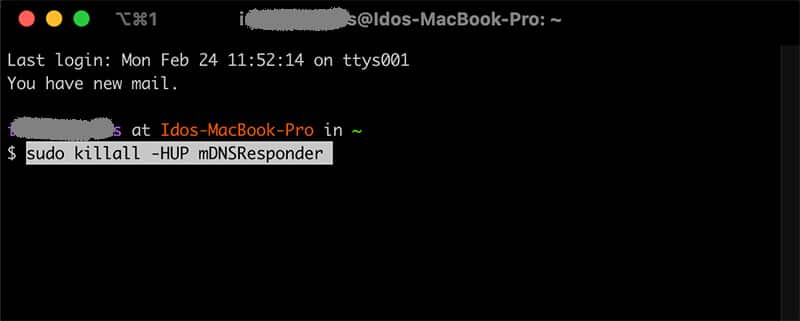
Wait for the DNS cache to clear before visiting your website.
If the two steps above don’t solve the “This Page Isn’t Working” error, we can try changing your DNS server values.
Change The DNS Servers’ Values
On the internet, a DNS server functions in the same way as a GPS.
When you type in a website’s domain name, your browser tells your browser which IP address to visit.
Your internet service provider will assign your DNS server to you by default.
However, connecting may be difficult because this server may not always be accessible or contain incorrect data.
You can switch to a different public DNS server, such as Google Public DNS, to resolve this issue.
You can use any public server, but remember that the DNS provider can access all the websites you visit.
To change the DNS server on a Mac, click on the Apple icon (top left corner) and select System Settings.
Search for DNS, and click on the DNS Servers option.

Click on the “+” icon and add the following Google public DNS servers: 8.8.8.8 and 8.8.8.4.
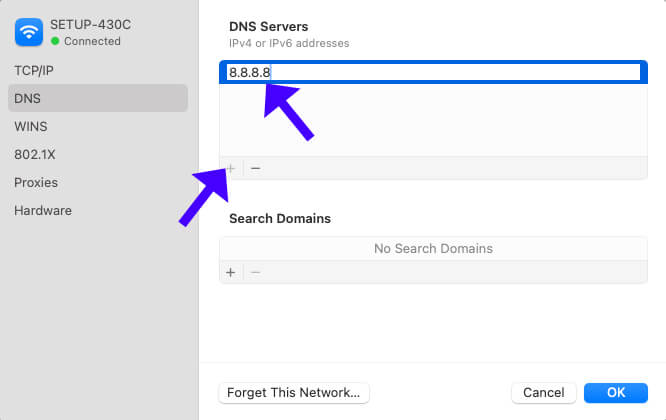
Once added, highlight the other DNS servers from the list and click the “-“ icon to delete them.
To change the DNS settings on Windows, please navigate to the Network and Sharing Center page.
Select the internet connection for which you want to modify the DNS settings.
Your active connection, typically called “Wi-Fi” or “Ethernet,” is on the right side of the window.
In the new window, you will see general information about your connection. Choose the “Properties” labeled button.
Scroll down to find “Internet Protocol Version 4 (TCP/IPv4)”, click on it to highlight it, and then click on the Properties button once again.
In the Internet Protocol Version 4 (TCP/IPv4) Properties window, select the radio button to use the following DNS server addresses and enter 8.8.8.8 and 8.8.8.4.
Save the changes and restart Windows to apply the changes.
Once you have done all the steps above, you should be able to access your website without seeing the “This Page Isn’t Working” error message.
If nothing above works for you, please purchase our One-Time Fix solution, and we will fix it.
This Page Isn’t Working Error – Frequently Asked Questions
This error can be caused by several factors, including incorrect DNS settings, server downtime or misconfiguration, a corrupt .htaccess file, issues with SSL or HTTPS settings, incorrect WordPress URL settings, a firewall or security plugin blocking access, and network issues or ISP restrictions.
Try opening other websites to see if they load. Restart your router or switch to a different network. Try accessing your site from another device or using a VPN. Flush your DNS cache (check the tutorial above).
Change your DNS settings to Google DNS: 8.8.8.8 and 8.8.4.4. If your domain was recently updated, wait for DNS propagation (24-48 hours).
Use an online tool like Down for Everyone or Just Me. Try accessing your site using your server IP instead of the domain. Restart your server (if you have access). Check with your hosting provider for outages.
Yes. To fix it, rename .htaccess to .htaccess_old via FTP. Then, try reaccessing your site. If it works, regenerate .htaccess by going to Settings → Permalinks and clicking “Save Changes.”
Yes. If you recently installed or updated a security plugin, it may have blocked access. Disable security plugins via FTP by renaming their folders in wp-content/plugins/. If using Cloudflare, temporarily disable Under Attack Mode or Firewall Rules.