
A dropdown list in Elementor is an efficient solution for improving navigation and keeping pages and content organized.
Although we can display the menu widget as a dropdown, we sometimes want to expand our options and add a dropdown structure elsewhere on our website.
Elementor doesn’t have a native, straightforward way to achieve this, but that doesn’t mean it can’t be done.
This tutorial will show you how to create a drop-down list with Elementor, using the HTML block and jQuery.
What you’ll build
You will create a select dropdown that:
- Displays a list of options (for example: Bugatti, Ferrari, McLaren).
- Scrolls the page to the matching section when an option is chosen.
- Optionally hides all sections and only displays the selected one.
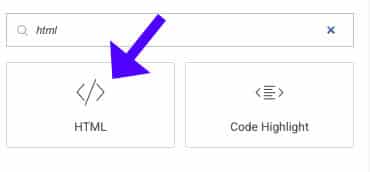
Step 1: Add the select element (HTML widget)
Elementor does not have a built-in select widget for this use case, so use an HTML widget and paste this code. Update the label and ID to match your content keyword (e.g., “recipes” instead of “car”).
<label for="carSelect">Choose a supercar:</label>
<br><br>
<select id="carSelect">
  <option value="">-- Select a car --</option>
  <option value="bugatti">Bugatti Chiron</option>
  <option value="ferrari">Ferrari SF90 Stradale</option>
  <option value="lamborghini">Lamborghini Aventador</option>
  <option value="mclaren">McLaren P1</option>
  <option value="koenigsegg">Koenigsegg Jesko</option>
</select>Important note: The id and labels (carSelect) are used by JavaScript. If you change it, you will also have to modify the scripts.
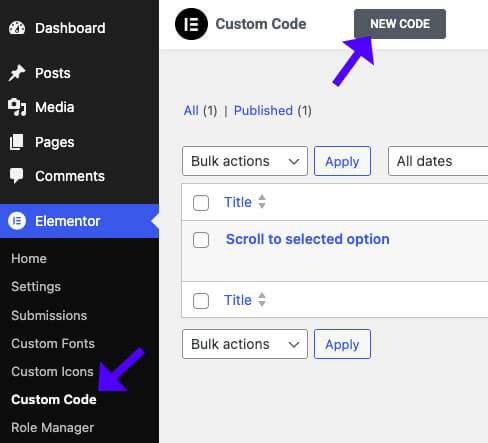
Step 2: Scroll to the selected section (JavaScript)
Add this script via Elementor > Custom Code (or your theme header) and publish site-wide. Make sure the getElementById value matches the select ID above.
<script>
  (function ($) {
    $(document).ready(function () {
      $('#carSelect').on('change', function () {
        const selectedCar = $(this).val();
        if (selectedCar) {
        $('html, body').animate({
          scrollTop: $('#'+selectedCar).offset().top - 25},500);
        }
      });
    })
  })(jQuery);
</script>The script locates the section of the webpage with the same ID as the selected option value and smoothly navigates the viewer to it in a smooth manner.
Step 3: Hide all sections and show only the selected one
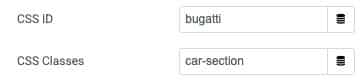
If, for some reason, you want to show a particular section of your page without having to scroll through it, all you need to do is assign a class for all the sections that you want to be targeted (for example, car-section), and specify a CSS ID of the same value as the selected car brand (e.g. Bugatti, Ferrari, etc.) to each section.
Then, you can implement the following coding script:
<script>
  (function ($) {
    $(document).ready(function () {
      $('.car-section').hide(); // Hide all sections
      $('#carSelect').on('change', function () {
        $('.car-section').hide(); // Hide all sections
        const selectedCar = $(this).val();
        if (selectedCar) {
          $('#' + selectedCar).show(); // Show selected section
        }
      });
    })
  })(jQuery);
</script>How to assign classes and IDs in Elementor
- Edit each section and add cars-section to the Advanced > CSS Classes field.
- Set the section ID (Advanced > CSS ID) to match the option value (for example, Bugatti).
- Publish and test on the live page.
Styling tips and common mistakes
- Keep IDs and values consistent. The option value must exactly match the section ID.
- Use meaningful IDs. Avoid spaces and special characters; use hyphens or PascalCase.
- Mobile test. Smooth scrolling and show/hide behavior can vary across mobile browsers.
- Accessibility: include a visible label and a default empty option so users know to select one.
Summary
Creating a dropdown list in Elementor is quick and easy. Just insert a select HTML element, add a little JavaScript to scroll or toggle visibility, and combine the IDs with the option values.
Such a method is an excellent tool for long-page navigation and, at the same time, enhances the user experience of organized content. Use it in your own parts and change the scripts where necessary.
Check if you make any problems, like the IDs, class names being correct, and double-checking where the custom code should go.
Please let us know or reach out if you have any questions.
