
If you want to add a unique touch to your website and enhance the user experience, changing the mouse cursor to a custom image or icon is a great way to do so.
Whether you run a travel blog, an e-commerce site, or any other type of website, a personalized cursor can complement your brand and make your site stand out.
In this guide, I’ll walk you through the steps to change the mouse cursor in WordPress, including how to do it in Elementor so that you can customize your cursor effortlessly.
Why Change the Mouse Cursor on Your Website?
The default mouse cursor is plain and universal, but it may not always reflect the style or theme of your website.
For example, if you have a travel blog, changing the cursor to a small airplane icon can add a fun and thematic element to visitors’ browsing experience.
This subtle customization trick can enhance your site’s branding and make it more memorable.
Choosing the Right Cursor Image
The cursor image or icon will be loaded on every page of your website. Therefore, the image size should be optimized to avoid slowing down your site.
Most browsers support cursor images to be no larger than 32 pixels by 32 pixels. This ensures a good balance between visibility and performance.
Furthermore, because there are different cursors for different elements on the page (such as links or text boxes), it will be wise to choose multiple images.
For example, you might want to use two different icons:
- A solid color airplane for the default cursor.
- A colorful airplane icon for when the cursor hovers over links.
Both should be in PNG format (SVG or WebP are also acceptable) with transparent backgrounds to maintain a clean and professional appearance.
How to Prepare Your Cursor Images
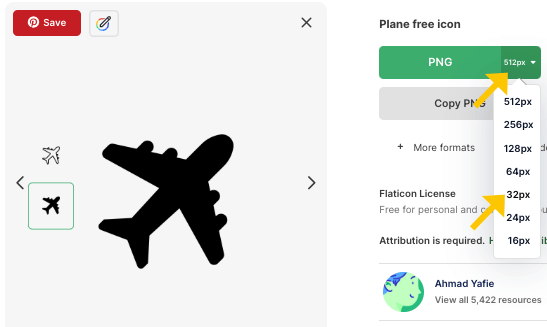
There are many image and icon websites you can visit to download the right image for your mouse cursor. Flaticon and Icons8 are two of the most popular ones.
Once you have found your desired item, click the down arrow next to the PNG format and select the 32×32 size.
After downloading the icons, it’s important to adjust their orientation to match the direction of a typical mouse pointer. Usually, this means pointing the icon to the left. You can easily do this in any image editing software or online editor tool such as Canva.
Once your images are ready, upload them to your WordPress media library. Once hosted online, you can grab their URL that you can use in your CSS code to apply the custom cursors.
Adding Custom CSS to Change the Mouse Cursor in WordPress
Now that your images are uploaded, it’s time to add the CSS rules that will apply the custom cursor to our website. Here’s how to do it:
- Go to your WordPress dashboard and navigate to Appearance > Customize.
- Open the Additional CSS section.
- Paste the following CSS code, but make sure to replace the placeholder URLs with the actual URLs of your uploaded cursor images:
body {
  cursor: url("your-solid-airplane-url.png"), auto;
}

a:hover {
  cursor: url("your-colorful-airplane-url.png"), auto;
}
Explanation:
bodySelector changes the default cursor across the entire website to a solid airplane icon.a:hoverThe selector changes the cursor to a colorful airplane icon when hovering over links.
Note: You can shorten the URLs by removing your root domain (e.g., https://yourwebsite.com/) if you prefer; the CSS will still function correctly.
After pasting and adjusting the URLs, publish your changes and visit your website to see the new cursors in action.
How to Change Mouse Cursor in Elementor
If you are using Elementor as your page builder, the process is very similar but with a slight difference in where you add the CSS:
- Edit any page with Elementor.
- Click on the Site Settings icon (usually a gear or hamburger menu at the bottom left).
- Go to the Custom CSS section.
- Paste the same CSS code you used in WordPress, replacing the URLs accordingly.
- Publish or save your changes.

Then, revisit your website to make sure the custom cursor is working correctly in Elementor-built pages.
Final Tips for Changing Your Cursor in WordPress
- Continuously optimize the quality of your cursor images for size and format to ensure your website loads quickly and efficiently.
- Ensure your cursor icons are clear and visible against different background colors.
- Test your website on multiple devices and browsers to confirm compatibility.
Frequently Asked Questions (FAQ)
PNG is recommended because it supports transparency, which makes the cursor appear clean and uncluttered. Other formats, such as GIF or SVG, might work, but PNG is the safest format for the website.
If you use properly optimized images (32×32 pixels), the impact on loading speed will be minimal. Large images can slow down your site, so keep size in check.
Yes, you can target different elements with CSS to assign different cursors. For example, using different cursors for buttons, links, or specific sections.
Absolutely. Remove or comment out the custom CSS code to return to the default system cursor.
Conclusion
Changing the mouse cursor in WordPress and Elementor is a simple yet effective way to add personality and branding to your website.
By following the easy steps above—selecting the right cursor images, uploading them, and applying a bit of CSS—you can create a more engaging experience for your visitors.
Please remember to keep your pictures optimized and test them across different devices to ensure everything runs smoothly.
Feel free to explore the site’s cursor styles that best fit your site’s theme and watch how this minor tweak can make a big difference!
