
Are you facing the “Upload: Failed to Write File to Disk” error in WordPress? You’re not alone.
This is a common issue that can bring your workflow to a complete stop, preventing you from uploading images, documents, or other media files to your site.
Luckily, fixing this problem is straightforward once you understand what caused it.
In this tutorial, I will guide you step-by-step through resolving the “Failed Write File to Disk” error, helping you fix this issue and continue managing your WordPress site.
Why Does the “Failed Write File to Disk” Error Occur?
This error typically happens due to one or more of the following reasons:
- Incorrect file permissions on your server
- Insufficient disk space on your hosting account
- Issues with the temporary folder WordPress uses for uploads
- Restrictive PHP settings that limit file uploads
Now, let’s explore how to address each of these issues.
Step 1: Check and Correct File Permissions
File permissions determine who can read, write, or execute files and folders on your server. It’s impossible to upload files to WordPress without the correct permissions.
To provide you with the proper writing access, follow the steps below:
- Access your website files: Use an FTP client, such as FileZilla, or your hosting control panel’s File Manager to navigate to your WordPress root folder.
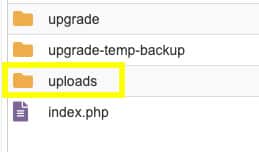
- Navigate to the uploads folder: Go to
wp-content/uploads.
- Set correct permissions: Right-click the uploads folder and select “File Permissions.” Set the numeric value to 755 for folders and 644 for files.

- Apply changes recursively: Ensure that these permissions are applied to all subfolders and files within the uploads directory.
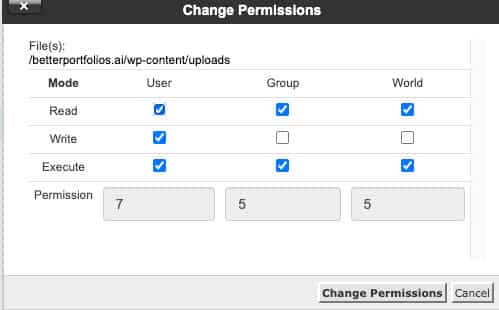
This setup allows WordPress to write files securely without exposing your site to risks.
Once you set it up, try reuploading the files and verify that the error has been correctly resolved. If you continue to experience the “Failed to Write File to Disk” error, proceed to the next solution.
Step 2: Verify Your Server’s Disk Space
Running out of disk space is a common cause of upload failures. Here’s how to check and manage your disk usage:
- Log in to your hosting control panel.
- Locate disk usage metrics: Most hosting dashboards display current storage usage and limits.
- Free up space or upgrade: If you’re close to or exceeding your quota, delete unnecessary files or media, or consider upgrading your hosting plan.
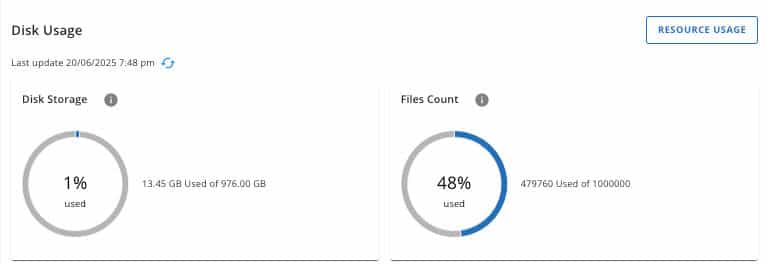
Freeing up space often resolves upload errors quickly.
Step 3: Fix Temporary Folder Issues
If neither of the fixes above helped, there is a high chance that your WordPress temporary folder is missing or misconfigured.
WordPress uses a temporary folder to handle file uploads before moving them to the uploads directory. If this folder is missing or misconfigured, uploads will fail, and an error will be displayed.
To fix this, we need to ensure a temporary folder exists inside the wp-content folder. Therefore, navigate to the wp-content directory and create a new folder named temp.
Once completed, we will need to notify WordPress that the folder was created and it can access it. To do that, follow these steps:
- Define a temporary directory: Access your site via FTP or File Manager and open the
wp-config.phpfile (located in your WordPress root folder). - Add this line of code:
define('WP_TEMP_DIR', ABSPATH . 'wp-content/temp/');
This ensures WordPress has a dedicated temporary folder for uploads and prevents write errors.
Step 4: Check and Update PHP Settings
The last solution, although less common, could be due to an outdated or misconfigured server’s PHP. The current server’s PHP configuration might limit file uploads by restricting file size or execution times.
A file that may be too large can drain the server’s resources and trigger an error. In that case, we will need to adjust the server’s settings to solve the problem.
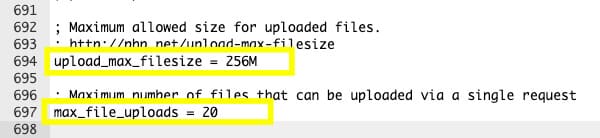
- Access PHP settings: Log in to your hosting control panel and locate the PHP configuration area or the
php.inifile. - Update upload-related values: Increase the values for
upload_max_filesize,post_max_size, andmax_execution_timeas needed. - Save changes and restart: Save your updates and then restart the server if necessary for the changes to take effect.
These adjustments enable the upload of larger files without timing out or being blocked.
Those were the most common methods to solve the “Upload: Failed to Write File to Disk” error in WordPress.
Step 5: Contact Your Hosting Support
If you’ve tried all the above steps and still see the “Failed to Write File to Disk” error, the issue might be specific to your hosting company.
Therefore, contact your hosting providers for assistance. They will be able to check for server-side permission conflicts, inspect disk quotas and limits, and resolve any unusual server configurations that may be causing the problem.
Hosting support teams are often the fastest way to identify and resolve complex server issues. However, their response waiting time may be longer during busy days, or based on your support tier package.
Conclusion
Resolving the “Failed to Write File to Disk” error in WordPress typically involves addressing file permissions, ensuring sufficient disk space, configuring the temporary folder, or adjusting PHP settings.
The steps above helped you troubleshoot and resolve this error straightforwardly, ensuring that your file uploads work smoothly again.
Remember to always back up your site before making changes to files or server configurations.
If you’re unsure about any of the steps above or prefer to have the pros fix it for you, be sure to opt for our one-time fix service or subscribe to one of our maintenance packages.
Frequently Asked Questions
Most often, incorrect file permissions, insufficient disk space, missing or misconfigured temporary folders, or restrictive PHP upload settings on your server are the causes of this issue.
Use an FTP client or your hosting file manager to navigate to wp-content/uploads and ensure folders have permissions set to 755 and files to 644. Apply these changes recursively.
Yes, if your website runs out of storage space, WordPress won’t be able to save uploaded files, resulting in this error.
Create a temp folder inside wp-content and then Define the temporary folder in wp-config.php by adding define('WP_TEMP_DIR', ABSPATH . 'wp-content/temp/');
Key settings such upload_max_filesize, post_max_size, and max_execution_time can definitely affect file uploads. Increasing these values enables the upload of larger files without errors.
Contact us or your hosting provider’s support team for help. They can investigate server-specific issues and assist with resolving permission or configuration problems.
