
On occasion, you may need a temporary WordPress staging area that is password-protected or accessible only to a specific client.
There are straightforward methods to do that; for instance, if you want to make one page invisible, you can hide the entire website for a short period, or you can use a code-based solution.
The methods discussed are three widely proven and trusted approaches, and this article explains when to use each.
Quick overview: Which approach to choose
- Built-in page or post password — Best for protecting a single page or post quickly without any code.
- Plugin method — Fast, safe, and ideal when you want to lock the whole site with an easy on/off switch.
- Custom function (no plugin) — Keeps your site plugin-free and lightweight, but requires editing your child theme files.
1. Protect a single page or post (built-in WordPress password)
WordPress is equipped with a simple visibility function that you can log in to and employ right away. This method is suitable for scenarios where only a specific page or post needs to be hidden from public view.
- Go to the Pages or Posts list in the admin area and open the item you want to protect.
- In the editor sidebar, look for the Visibility or Status option and choose Password Protected.
- Enter a password and save or update the page.

- Test by opening the page in a private browser window. Visitors will be prompted to enter the password to view content.
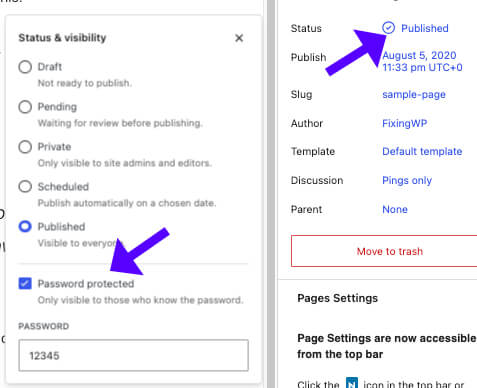
This is a quick, plugin-free method that is directly available for individual content pieces.
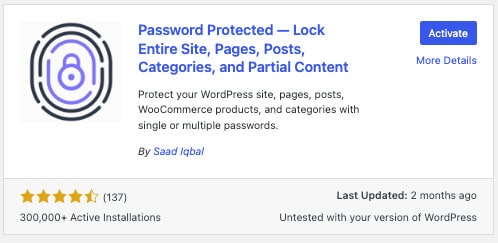
2. Password Protect WordPress with a plugin (easy site-wide option)
If you prefer to secure the entire site. Protect it with a single click; then consider using a lightweight plugin. One standard plugin option well-suited to this case is Password Protected, which provides a global switch and a few custom exceptions you can define.
- Install and activate the Password Protected plugin, or a similar site-lock plugin, from the plugin directory.

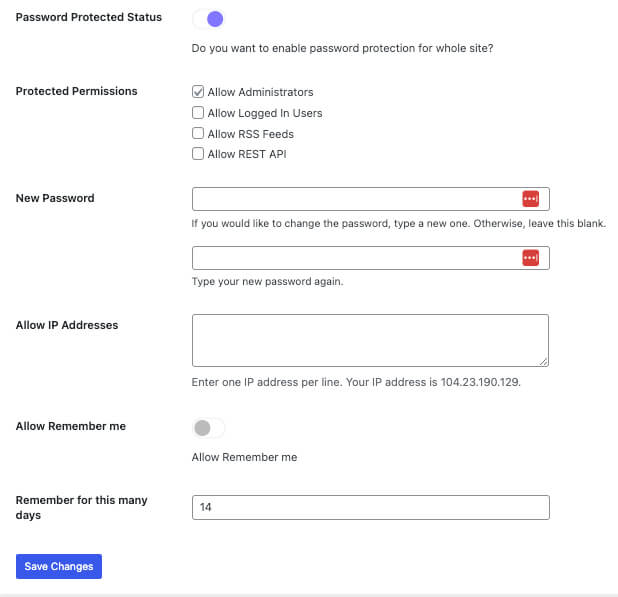
- Open the plugin settings and enable password protection by toggling it on.
- Optionally allow administrators to access the site without a password, so you can continue developing freely.
- Set a password and save changes.

- Verify the site in an incognito window; it should now require a password to view any page.
Plugins are the most common and preferred way for users to access content securely. The thing is, they can be used to restrict public access without requiring code changes, and they can be configured securely and reconfigured.
3. Password Protect WordPress without a Plugin (custom function)
For a plugin-free approach that still protects the entire site, add a small authentication function to your child theme‘s functions.php file. This technique implements a custom username and password form that runs before the site content loads.
Steps to follow:
- Always work in a child theme. Back up your site before editing any theme files.
- Open Appearance > Theme File Editor and select the functions.php file of your child theme.
- Paste the authentication function near the end of the file, and customize the username, password, and the error message displayed for failed attempts.
- Save the file and test in a private browser window. You should see a simple login prompt requesting the credentials you configured.
// Password protect a WordPress website
add_action('init', function () {
    // Don't protect admin, cron, or CLI requests
    if (is_admin() || is_user_logged_in() || (defined('DOING_CRON') && DOING_CRON) || (defined('WP_CLI') && WP_CLI)) {
        return;
    }
    $USER = 'demo';
    $PASS = '12345';

    $u = $_SERVER['PHP_AUTH_USER'] ?? '';
    $p = $_SERVER['PHP_AUTH_PW'] ?? '';

    if ($u !== $USER || $p !== $PASS) {
        header('WWW-Authenticate: Basic realm="Private Site"');
        header('HTTP/1.0 401 Unauthorized');
        echo 'Authentication required.';
        exit;
    }
});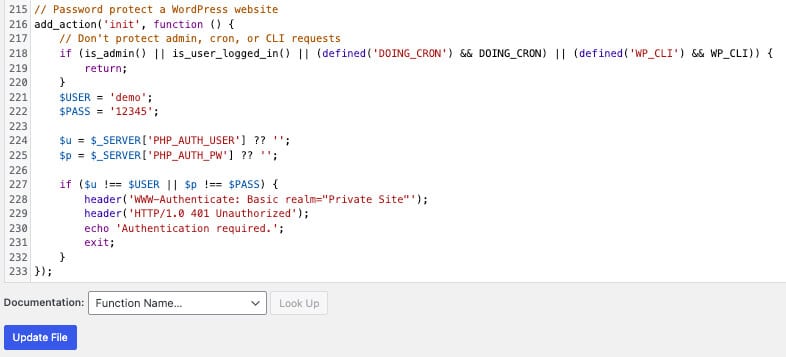
A very common test credential is “demo” as the username and “12345” as the password. It is advisable to change these passwords to strong, unique ones before granting others access.
You can keep your WordPress site lightweight by using the Password Protect WordPress method without a Plugin, but it requires familiarity with editing theme files. If anything goes wrong, you can always restore from a backup or turn off the feature via FTP.
Best practices when using a custom function
- Use a child theme so updates to the parent theme do not overwrite your changes.
- Choose strong credentials and change test passwords before handing access to anyone.
- Disable caching or configure your caching plugin so authentication works as expected for logged-out users.
- Keep a backup and know how to access files via FTP or your host control panel in case you need to revert edits.
When to use each method
Use the built-in single-page password option when your requirements are basic. If you want a quick site-wide lockdown with minimal risk, use the plugin method. Choose the custom function when you do not wish to use any other plugins and are confident about making changes in the theme.
Security notes and alternatives
For stronger protection, consider web server-level authentication, such as HTTP Basic authentication via .htaccess and .htpasswd, or use hosting provider password protection tools.
These options are robust and work before WordPress even loads, which can be helpful for high-security staging environments.
Conclusion
The article focuses on the basic steps for password-protecting WordPress without a plugin.
These methods can be performed easily with the proper knowledge. It is recommended that you choose the method you find most suitable and test it.
Please leave a comment on which of the methods above you are using to password-protect your website.
